This is about
Code
6 minutes
26 Sep 2023
This is about
Code
6 minutes
26 Sep 2023
Diving into Google Analytics 4


Nowadays, it’s clear that data and statistics are game changers in all businesses and fields. Like the web, analytics are very important to take your business to the top. But the big question is: Am I tracking my website traffic correctly 🤔?
In this post, we are introducing how we set up website analytics with the new powerful tools Google Analytics 4 [GA4] and Google Tag Manager [GTM], which are the recommended ways to use by the Google Support team ™️.
Google Analytics 4
Google Analytics 4 [GA4] is considered the next generation of Google Analytics. It’s a complete re-imagining of what data collection and analysis could be, bringing together everything that worked well in Universal Analytics with brand new features designed to take advantage of the opportunities presented by big data and machine learning.
I’m not going to talk too much about the advantages of GA4 because there are a lot of blogs/articles that explain how amazing GA4 is and why you should switch to it ASAP if you’re still using Universal Analytics. Here’s one of them.
Google Tag Manager
Google Tag Manager [GTM] is a free tool that enables you to install, store, and manage marketing tags without modifying website code. Like GA4, GTM is a powerful tool with many characteristics, and you can check some of them here. So, Let’s get started.
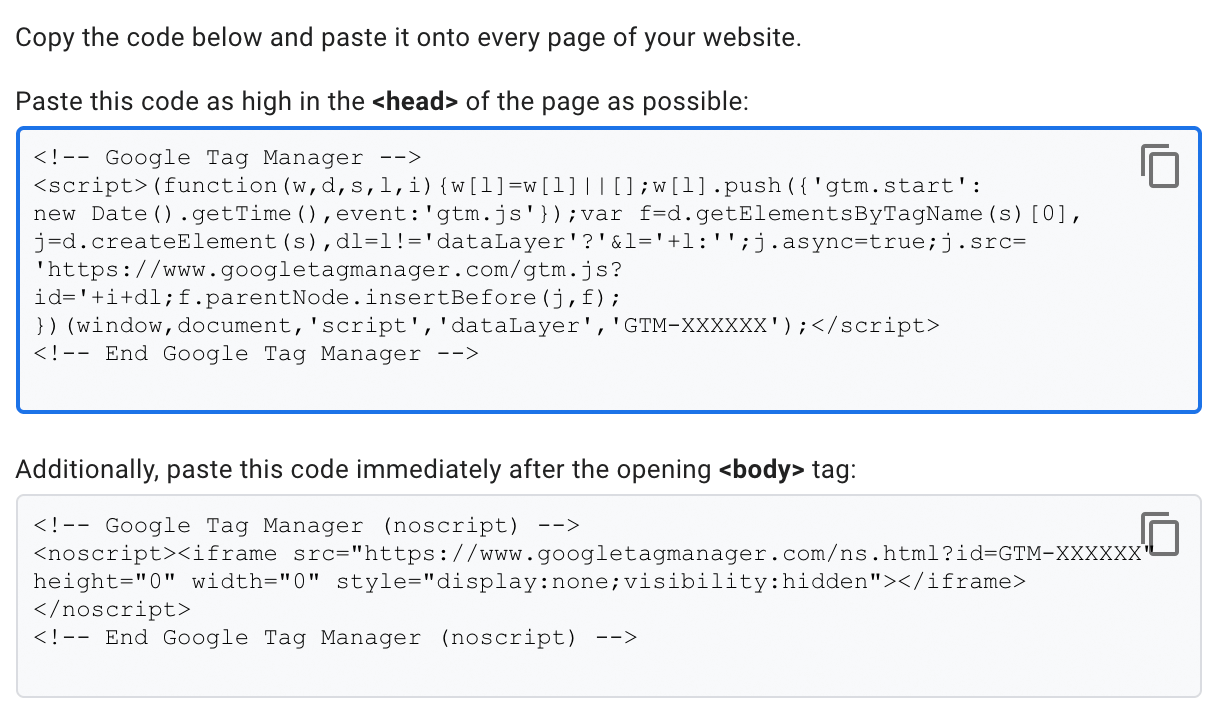
First, we must create a Google Tag Manager account and container; learn more. After that, we click the container ID (formatted as GTM-XXXXXX) at the top of the window to launch the Install Tag Manager window.
GA4 tag
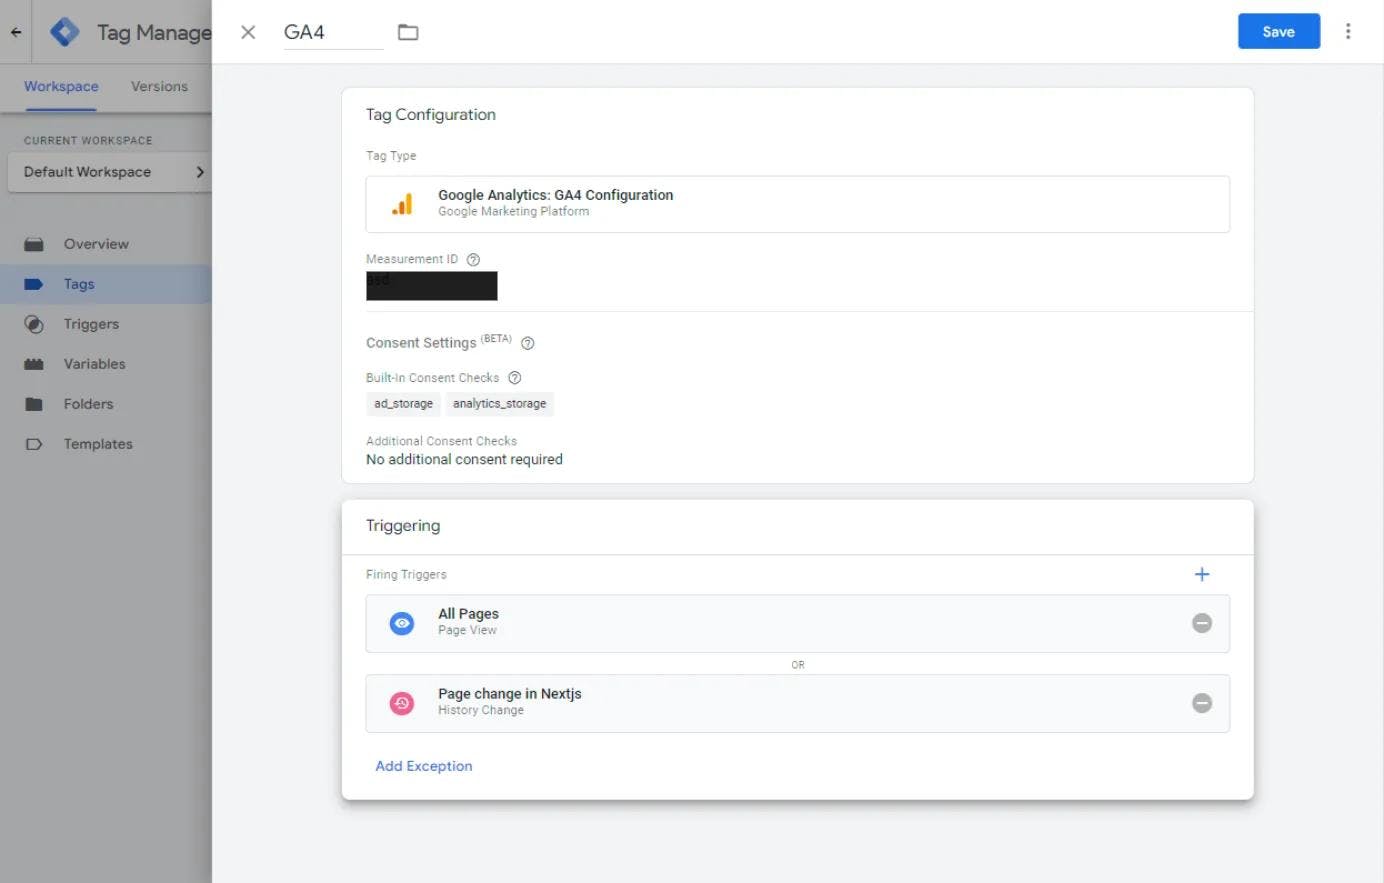
Now, let’s create a new Tag to handle Google Analytics (you need a Google Analytics GA4 active account and its Measurement ID):
- Go to the Tags section and click the New button.
- Click Tag Configuration and add the Google Analytics: GA4 Configuration tag type.
- Configure it by adding the Measurement ID (you can get it from Google Analytics configuration).
- Then scroll down to Consent Settings and choose No additional consent required.
As you can see, GA4 has a built-in consent check enabled for ad_storage and analytics_storage. You must give Tag Manager these two consents to enable cookie storage and tracking from Google Analytics.
Then, you need to configure the Firing Trigger. For Analytics to be fired on every page, you must trigger All Pages and History Changes. (The image below shows that the History Change trigger is for the NextJS app; you can choose whichever trigger your app is built on top of).
Consent mode
Consent mode allows users to store information about their visit. We can either manually create some logic to prompt the user to give us their permission, or there are consent management platforms you can integrate into your site to do all the work for you. In this post, we will build everything manually to see exactly how these processes work.
It is important to know that many countries and regions have passed laws that require you to get consent from the user before you store information about the behavior that they make on your website.
No stress. There is not much code you’ll have to do because the main advantage of this new logic is using less code and doing everything by yourself without asking a developer to make changes for you in the codebase each time. But we need to inject a small piece of code at the beginning.
We add the GTM script on every page of our site. Depending on the framework you are using, the way to add the GTM script might slightly differ.
Default consent
This script runs before the GTM script. That way, we preload our default consent so that it already has that set when the tag manager loads.
Update consent
In our cookie banner component, we will implement a simple Accept/Decline logic to set the consent based on the user selection. Then, we’ll start getting analytics responding based on that selection.
Managing consent
Let’s get back to the Google Tag Manager interface,
- Go to the Admin tab.
- Select Container Settings.
- Then check Enable consent overview ✅
Now, if we go to Tags, we’ll see a small shield 🛡️ icon beside the New button. By clicking on it, we can identify which tags have been configured for consent versus those that haven’t. There, we can configure additional settings for consent if we want.
If we want to check and ensure that our banner is working on our website and receiving the user’s input, we can go ahead and click on Preview and connect our site URL. Then, we’ll start to use Tag Assistant.
Custom Events in GTM
Now, it’s the best part: event tracking. We want to create a new tag to track and measure a specific event made by the user while visiting our site.
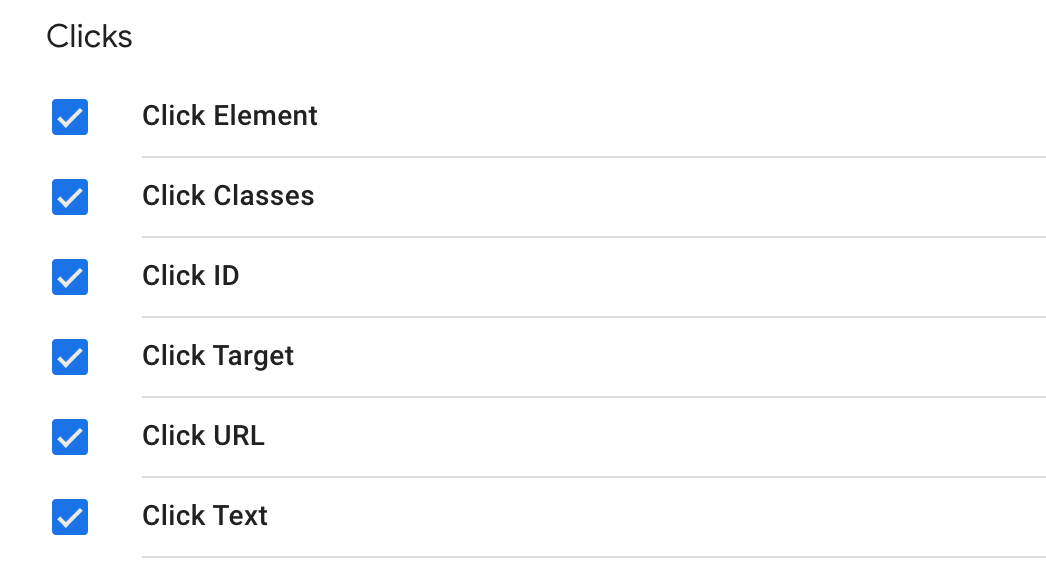
So first, we need to enable the event/trigger we want to fire by going to Variables and then clicking the Configure button. A long list of variables will pop up, and we’ll enable the ones we want to fire.
Let’s do an example of tracking a button click, so we need to check all the Clicks variables.
Then we jump over to Tags to create our new tag, give it a title, and choose Google Analytics: GA4 Event for tag type; then, for the configuration, we choose the same configuration as our first tag (Google Analytics: GA4 Configuration). For the Event Name, it is recommended to name it with a lowercase, separated by an underscore (e.g., subscribe_click), which is the convention for event naming.
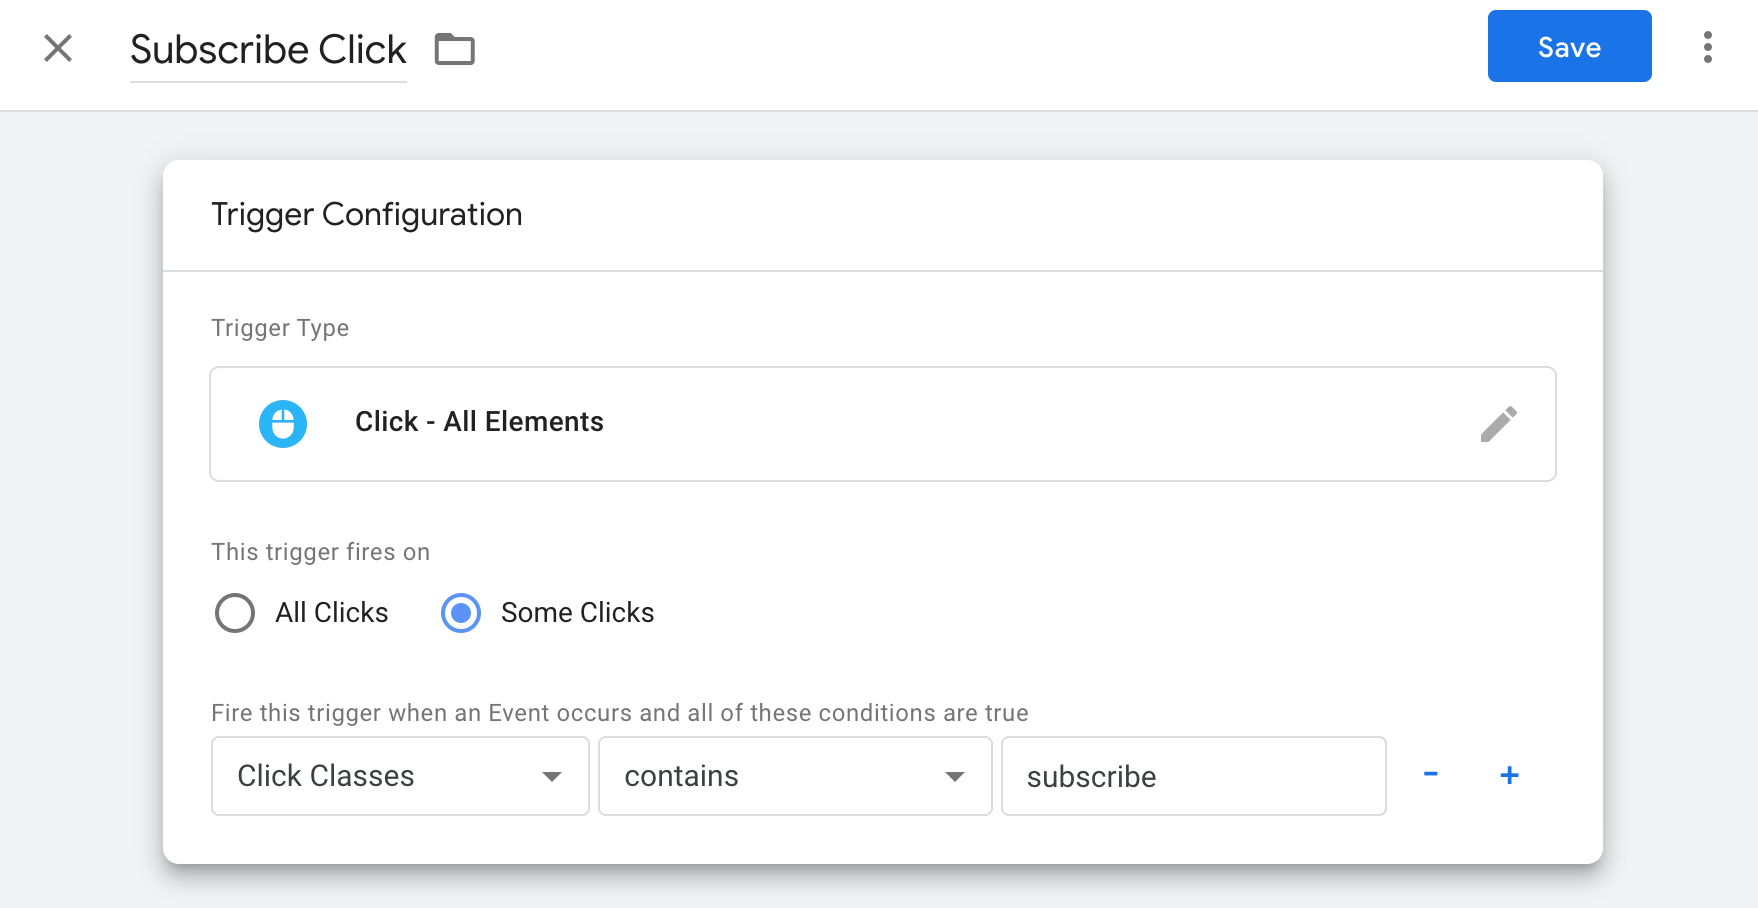
Next, we will set how we want our event to fire so there is a Triggering section at the bottom of the tag panel. Let’s create a new trigger. For the trigger type, there are several options that you can choose depending on your application/tracking strategy. For example, we want a click event to choose one of the Click triggers (All Elements or Just Links). If we have a link, we could only choose Just Links, but we are tracking a button click, so we’ll go for All Elements.
There are a lot of use cases where a trigger can be more useful/optimal to use than another, so it’s something that you should dig more into it, and we are not mentioning it here to keep this post simple.
In our example, we want the trigger to fire if the element clicked has the word subscribe on its class:
And voila! Now, you can test if your event is firing by checking the Tags panel in the Preview mode.
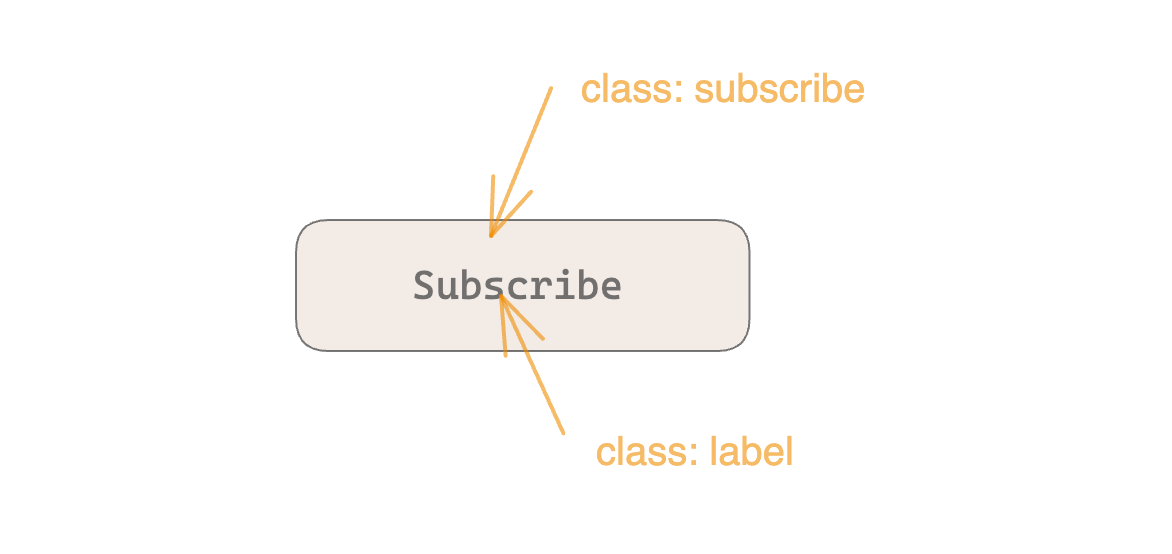
Pay attention ⚠️
There is an edge case (in our example) among many others (in other examples) where you click the label inside the button instead of the button’s background. In this case, the event will not be triggered because the label does not have the word subscribe to its class or doesn’t fulfill the conditions set in the trigger. What we should do in this case or a similar one is to find a way to fire the event whatever the edge case is, either by adding a new trigger (not very optimal, especially if you have many edge cases for one event), or using RegEx or matches CSS selector, …etc.
Conclusion
This was just an introduction to Google Analytics 4 and its use with Google Tag Manager. This should be just an appetizer to explore and do more things with these powerful tools and take your site analytics to the next level 🚀
Droplets
Droplets
Sign-up to get the latest insight from 14islands. We send a newsletter only once every quarter with inspirational links and creative news. It's short and sweet. You can unsubscribe it at any time.